Building beautiful screens is only half the job.
If your screens don’t connect, your app doesn’t work.
In this guide, you’ll learn how to add navigation to your app in AppForceStudio, so users can move from one screen to another and experience a real, working app flow — not just static designs.
In AppForceStudio, you can connect screens visually, update destinations at any time, and control your app’s starting screen, all inside the Playground Canvas.
This guide walks you through the exact process.
By the end, your app screens will be fully linked and ready for preview and testing.
What Is Navigation in an App?
Navigation is what allows users to move between screens.
For example:
- Login → Dashboard
- Dashboard → Profile
- Product → Checkout
- Back → Home
Without navigation:
- Buttons don’t go anywhere
- Cards don’t open detail pages
- Icons don’t trigger actions
With navigation, your app becomes interactive.
In AppForceStudio, navigation is added directly inside the Playground Canvas using the built-in Navigation panel and Storyboard system.
What Navigation Does in AppForceStudio
Navigation controls what happens when a user clicks something.
For example:
- “Get Started” → Sign Up screen
- “Maybe Later” → Home screen
- Profile icon → Profile screen
Once navigation is set:
- Green storyboard lines appear between screens
- You can preview real user flow
- Your app behaves like a real product
Build Real Apps, Not Just Screens
Adding navigation is one of the most important steps in app building.
It’s what makes your app usable.
It’s what lets you test real user flows.
And in AppForceStudio, it only takes a few clicks.
Before You Start
Make sure:
- You already have at least two screens in your playground.
- You’re inside the Canvas view (not Code view).
If you don’t have multiple screens yet, click Add Screen at the top of the Canvas.
Step-by-Step: How to Add Navigation in AppForceStudio
Step 1: Select the Clickable Element
On your Canvas:
- Click the screen where navigation should start.
- Select the element that should move the user.
This could be:
- A button
- An icon
- A card
- An image
- A text element
- Any clickable component
When selected:
- The left panel (Tree panel) will highlight the element.
- The right Properties panel will update.
- You’ll see a green button labeled “Open Navigation.”
That means the element is ready to be linked.

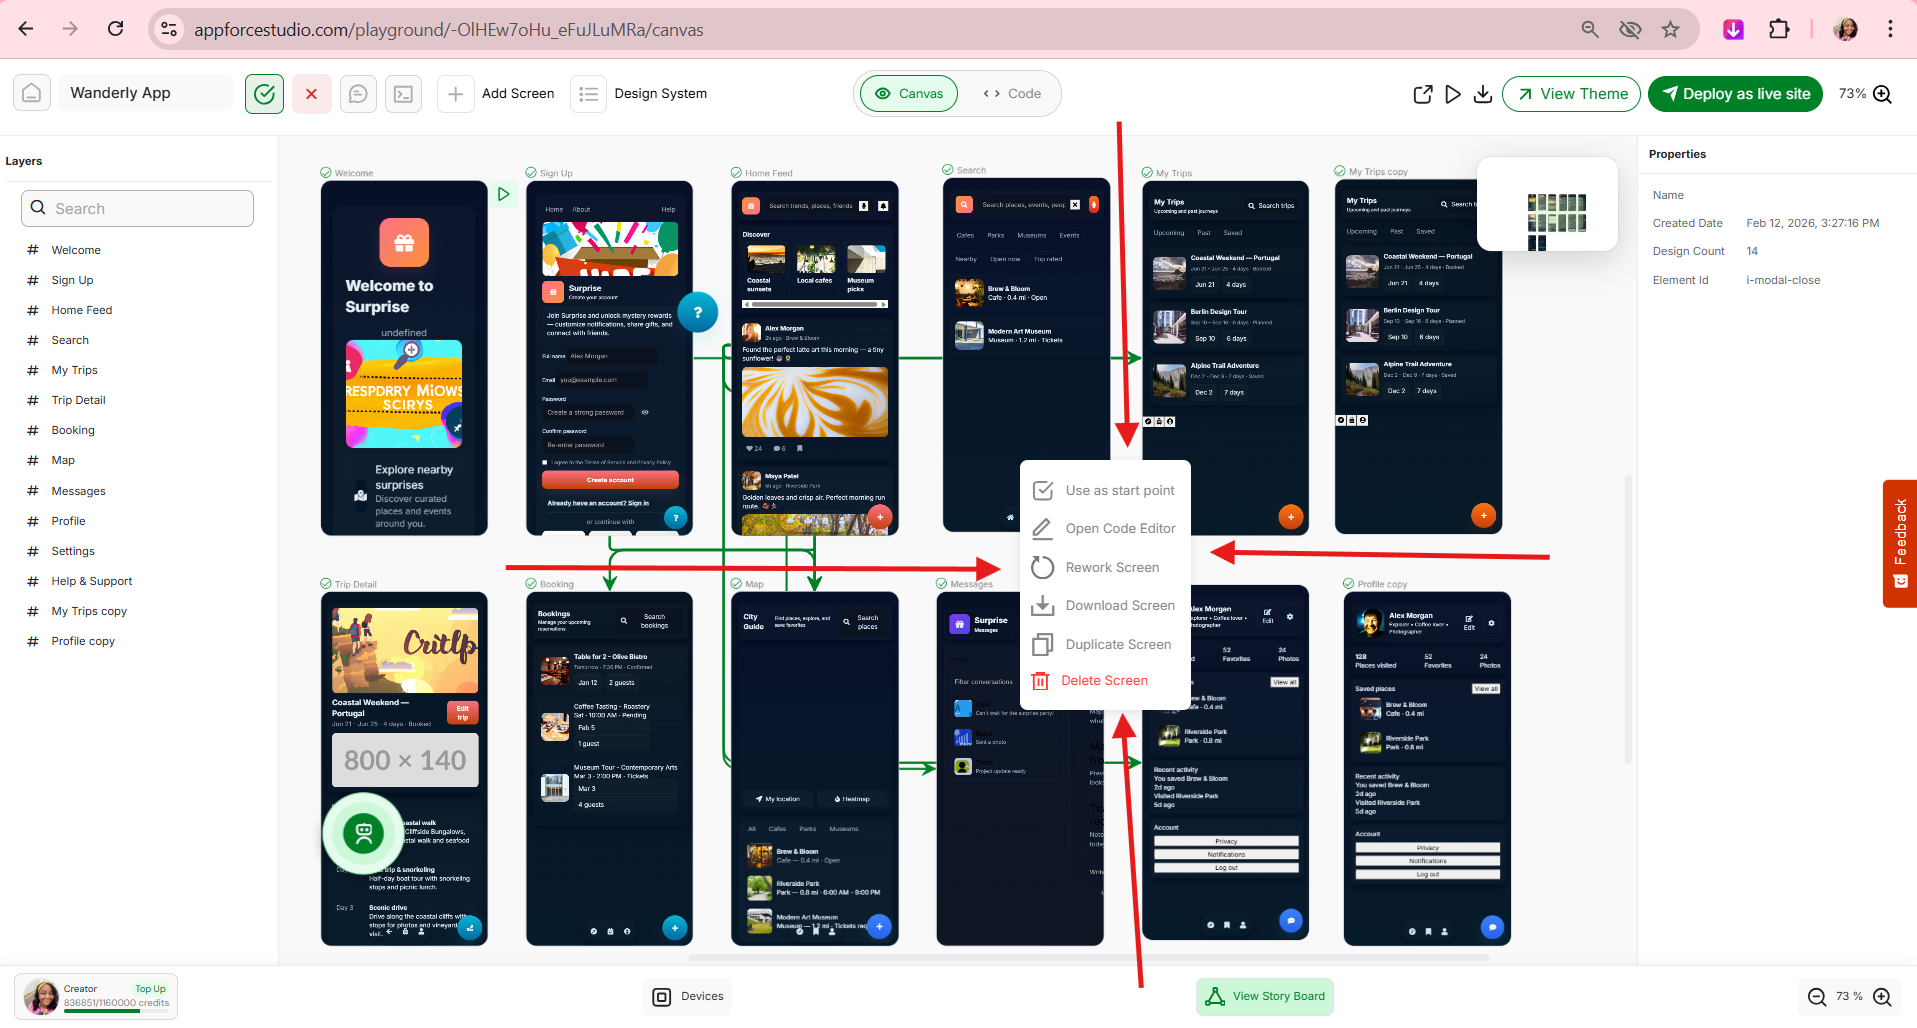
In the image above, the “Maybe Later” button is selected.
When selected:
- The element is highlighted on the Canvas.
- The left Layers panel shows the selected element.
- The right Properties panel shows the selected element name.
This confirms exactly what you’re editing.
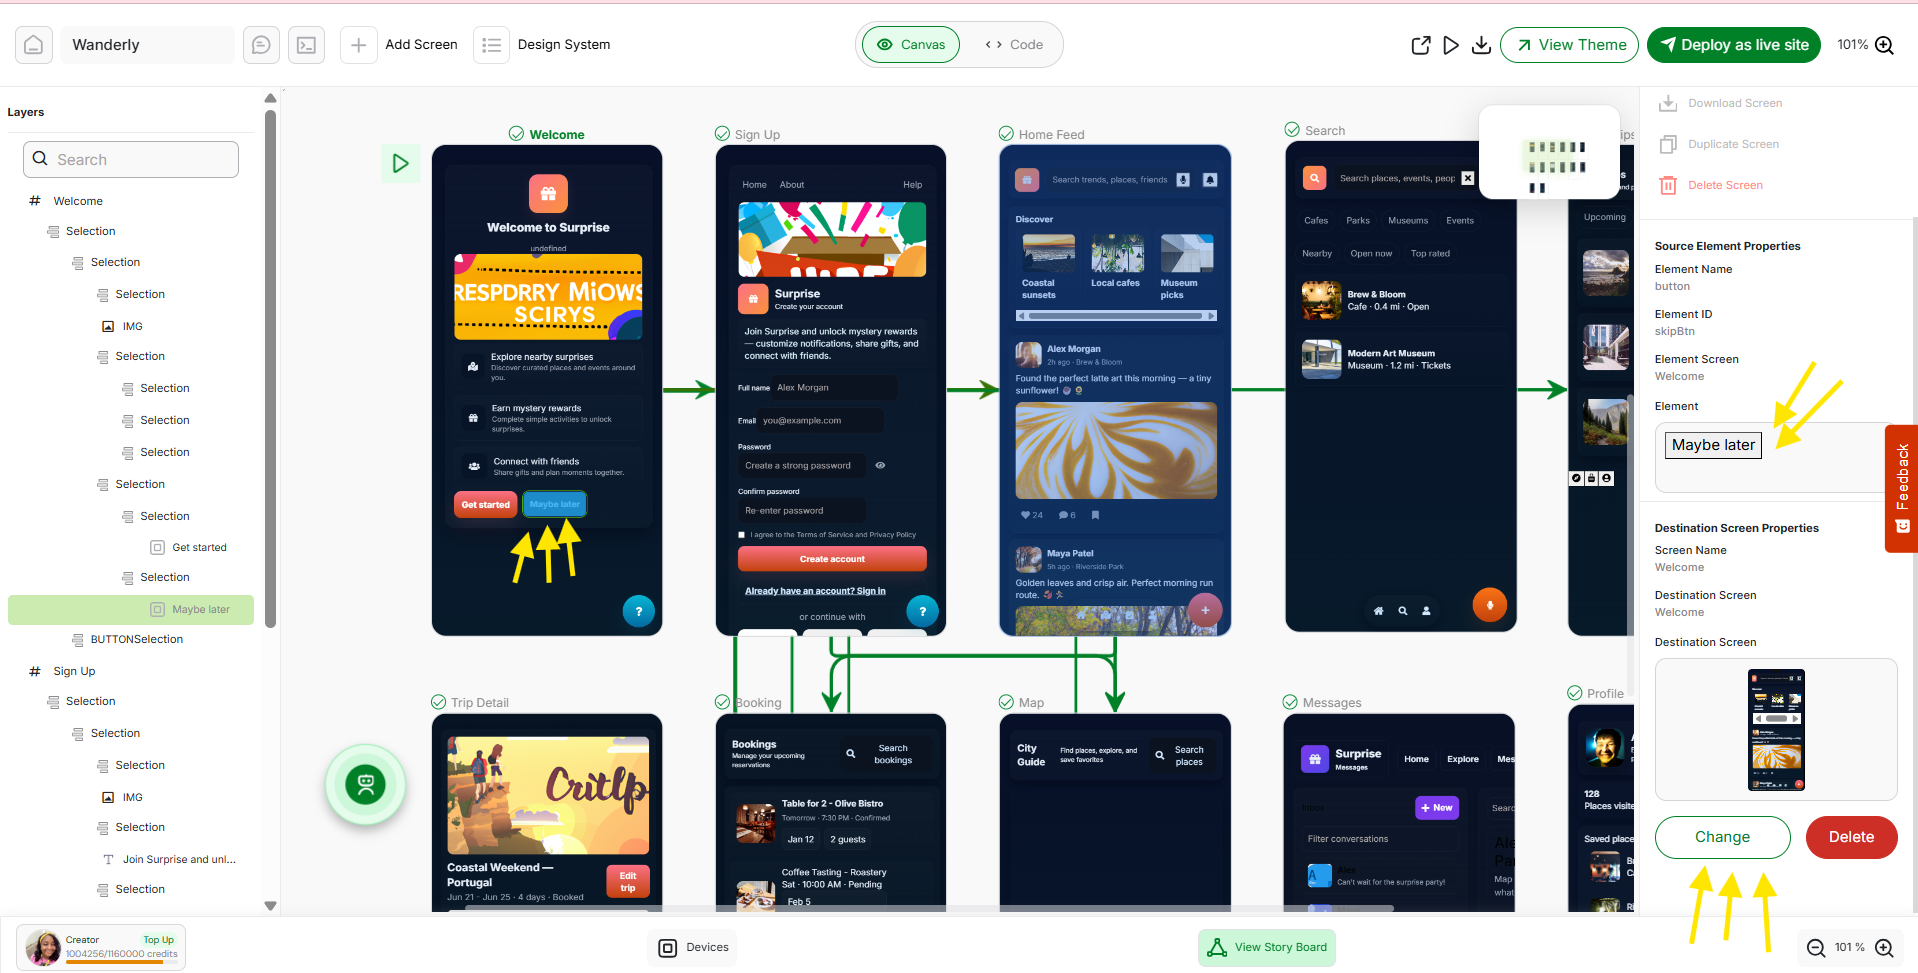
Step 2: Open Navigation Settings
Click Open Navigation in the Properties panel.
The right panel will expand to show:
- Source Element (what you selected)
- Source Screen
- Destination Screen options
- A preview of the selected destination
This is where you define what happens when the user clicks that element.
In the right Properties panel:
If no navigation exists yet, click Open Navigation.
- If navigation already exists, you’ll see:
- The current destination screen
- A screen preview
- Change button
- Delete button
Step 3: Change the Navigation Destination (Optional)

If you click Change:
A modal titled “Change Navigation Destination” opens.
Inside this modal:
- All app screens are displayed visually.
- You can select a new destination screen.
- The selected screen will be highlighted in green.
- Click to confirm your selection.
Once selected:
- The navigation updates immediately.
- The storyboard connection updates automatically.
You can close the modal using the X in the top right.
For example:
- “Create Account” button → Sign Up screen
- Profile icon → Profile screen
- Product card → Product Detail screen
Once selected, the navigation is saved automatically.
Step 4: Delete Navigation (If Needed)
If you decide you don’t want navigation at all:
Click Delete in the Properties panel.
This will:
- Remove the connection
- Remove the green storyboard arrow
- Turn the element back into a static component
Navigation can always be added again later.
Step 5: View Storyboard Connections
Once navigation is set, you will see green lines between screens. These arrows represent:

- What screen is linked to what
- The direction of user flow
- The structure of your app journey
This visual mapping is your Storyboard view inside Canvas.
You can instantly understand how users move through your app.
Step 6: Set or Move the Start Screen
You will also notice a small Play button icon beside one screen.
This icon represents your start screen — the first screen users see when the app opens.
You can:
- Drag this play button
- Move it to another screen
- Place it beside your preferred start screen
This lets you control where your app begins.
It’s especially useful when:
- You’re testing different onboarding flows
- You want to skip login for demo purposes
- You’re restructuring your app journey
Step 7: Preview Your App Flow
Now test it.
- Click Preview
- Tap the element you connected
- Watch it move to the destination screen
If it works, your navigation is live.
If not, go back to the Properties panel and adjust the destination.
Example: Adding Navigation to a Sign-Up Flow
Let’s say you have:
- Welcome Screen
- Sign Up Screen
- Home Screen
Here’s how it would work:
- Select the “Create Account” button
- Open Navigation
- Set destination to “Sign Up”
- Green arrow appears
- Preview → Click button → It opens Sign Up
That’s it.
You’ve turned static screens into a working app flow.
Why This Matters
Navigation is what transforms:
Design → Prototype
Prototype → Real App
In AppForceStudio, you’re not just arranging screens.
You’re building structured user journeys.
And because navigation is visual, you:
- See your app logic instantly
- Avoid broken flows
- Iterate faster
- Prototype confidently
Common Questions (FAQ)
Yes. Different elements on the same screen can link to different destinations.
Yes. Open the navigation panel and delete the connection.
Yes. Open the element, click Open Navigation, and choose a new destination.
Ready to Try It? Build on Web or Mobile
Start connecting your screens today.
Build on web or download the AppForceStudio AI App Builder from the App Stores and start connecting your screens today.